Quantcast
Channel: LED cube – Hackaday
Viewing all 37 articles
Browse latest View live

Flowerboard LED cube

$
0
0

Here’s a neat 4x4x4 LED cube made with an ElecFreaks Flower Protoboard.

A few days ago, we posted a neat new prototyping board made specifically for SMD work. Instead of the usual ‘holes-with-circles’ protoboard layout, the ElecFreaks team decided to go with a flower-shaped pad. This makes it especially easy to deal with SMD components when building whatever. To demonstrate their new protoboard, ElecFreaks built an awesome-looking 4^3 LED cube. Just look at those solder traces.

The LED cube itself is nothing we haven’t seen before, but the construction of this thing is amazing. The entire build is on the Arduino Mega Flower shield, meaning there are no wires at all. Everything, from the resistors to the transistors, is an SMD component. The only problem now is bending and soldering all those LED leads.

This Flower Protoboard is starting to look more and more interesting; check it out in action after the break.


Filed under: led hacks, tool hacks

The best LED cube build we’ve seen

$
0
0

[Nick] wrote in telling us about the LED cube he built over the course of six months. He calls LED cubes ‘done to death,’ but [Nick] might be too humble. His 8x8x8 RGB LED cube is the best we’ve ever seen.

To start his build, [Nick] built a simple 4x4x4 cube as a proof of concept. The baby cube worked but the fabrication process got him thinking. Instead of building his monster LED cube in layers from the bottom up, he would need to build columns from left to right. After the construction of a jig, soldering eight panels of 64 LEDs, and buying a new soldering iron tip, [Nick] had a beautiful assembled LED cube. The only thing missing was the electronics.

Most of the LED cubes we’ve seen use the TLC5940 LED driver for hardware PWM, [Nick] decided to go with the simpler but more familiar STP16 chip. After hooking up his huge LED driver board up to a chipKIT Uno, the 80 hours of programming began.

In the end, [Nick] built the best LED cube we’ve seen (even though it isn’t the largest) and put together one of the best build logs in recent memory. Because no LED cube build is complete with out a video there’s an awesome demo after the break.


Filed under: led hacks

Simulating LED cubes in Blender

$
0
0

The Jyväskylä, Finland hackerspace hacklab-jlk was lucky enough to work on a public arts project for their home town. They had the opportunity to design, build, and install a trio of LED cubes in Jyväskylä’s central Church Park. As such a high-profile project, the hacklab-jlk team decided to take their time and ended up implementing a lot of very cool features for their LED cubes, including simulating the light show in Blender.

The LED cube is similar to all the other LED cube builds we’ve seen before; it’s an 8x8x8 cube controlled by an ATMega328. The Elovalo project, as it is called, is a trio of LED cubes – one using red LEDs, one using green LED, and a blue LED cube each mounted on a pedestal in a Jyväskylä park.

Because the Elovalo is a permanent installation, the team needed a way to verify new firmware for the LED cubes. They came up with a LED cube simulator for Blender that allows them to write a new display function in C and render either single frames or a full animation of the lighting pattern.

A very cool build, and nearly too awesome for a public arts project. We look forward to a video of the complete installation, but until then we’ll make do with the short preview video available after the break.


Filed under: led hacks

4096 LEDs means the biggest LED cube ever

$
0
0

Adaptive Computing, a cloud management and high performance computing outfit in Utah, needed something really cool to bring to their trade shows. Something that makes order out of chaos, and demonstrates their attention to detail in the midst of miles of wiring. They decided building the largest non-commercial LED cube would be a good project, and thus the 16x16x16 All Spark Cube was born.

The All Spark Cube was constructed using 10 mm RGB LEDs wired together with three-foot lengths of 16 ga pre-tinned copper wire. In this video, [Kevin] shows off the process of constructing a single row; first the LEDs are placed in a jig, the leads are bent down, and a bus wire is soldered to 16 individual anodes per row.

The hardware for the build uses 16 Arduino Megas with a custom-made shield powering a 16×16 LED grid. The custom shields provide the 24V for the LEDs, 5V for the ‘duino, The Arduino boards communicate to each other through an RS485 connection, and the entire cube is connected to a computer through an RS232 serial connection.

The software is, admittedly, still a little janky. [Spencer] and [Thomas], the Adaptive Computing volunteers that are working on the control system, are still having a few problems getting logos and animations to display. They have managed to create a control app to draw individual pixels, as seen after the break.

Not bad for nearly a mile of wire and a summer’s worth of work, huh?


Filed under: led hacks

8x8x8 LED cube and the board that drives it

$
0
0

Check out the LED cube which [Thomas], [Max], and [Felix] put together. But don’t forget to look at that beautiful PCB which drives it… nice! But hardware is only part of what goes into a project like this one. After the soldering iron had cooled they kept going and wrote their own software to generate patterns for the three-dimensional display.

Looking at a clean build like this one doesn’t drive home the amount of connections one has to make to get everything running. To appreciate it you should take a look at this other 512 LED cube which has its wires showing. You can see from the schematic (available in the project repository) that all of these lines are managed by a series of shift registers. The board itself connects to a computer from which it gets the visualization commands. A Java program they call CubeControl can push letters or turn the cube into a VU meter.

The team built at least two of these. This smaller version uses red LEDs, while the larger one shown in the video after the break has blue ones.


Filed under: led hacks

7x7x7 LED cube driven by Arduino mega

$
0
0

7x7x7-led-cube

Sure, the physical build itself looks great, but it’s what [Michael] did with the firmware that impresses us the most. He’s using an Arduino Mega to drive the 7x7x7 cube and manages to squeeze out what he calls 142 frames per second with the setup. We’re not sure FPS is the right measurement, as we believe it’s the multiplexing rate that he’s trying to describle. It takes 144 uS to scan the entire matrix once. He performs the scan seven times per frame and the result is a flicker-free appearance, even to cameras.

You can see a video demonstration after the break. Since [Michael] emailed us directly with more details about the build we’ve pasted those below the fold as well.

If you’re looking for a more entry-level Arduino LED cube this 4x4x4 project is just the thing.

The cube is able to process 142 frames per second, that is, 1 frame every 7 milliseconds. Within this time period, it loops through a still frame 7 times (Each cycle of POV lasts 144 microseconds). This is able to compensate for flickering during video recording, allowing all camera’s to record fluid video without distortion.

The cube itself is controlled with an Arduino Mega 2560. For each frame in memory, the Arduino reads and bit shifts 49 bytes of data for an encoded duration. This allows for the cube to be applied to a variety of purposes, from text display to effects to music visualisation.

The frames were generated through complex Processing scripts, allowing for a multitude of operations such as shifting in any direction (seen in the rain effect), and an edge shift (seen in the scrolling text around the outside of the cube). These scripts were used to perform the basis of calculations for fireworks, as well as sine waves in 1, 2 & 3 dimensions (seen in the video).

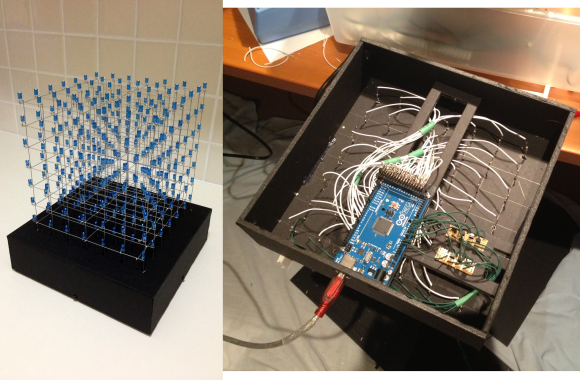
In this cube the supporting structure was made 0.9 mm galvanised steel wire, straightened by stretching the wire. The 5mm Blue LED’s are positioned 30mm apart, with the anodes being attached to the verticals (white wires in the image below) & the cathodes are attached to the horizontal layers (green wires in the image below – bottom right – shown passing through NPN transistors). The Arduino Mega 2560 R3 is positioned on a suspended platform, with the anodes controlled on the Digital Pins as opposed to the cathodes on remapped AnalogInputs.


Filed under: Arduino Hacks, led hacks

Hackaday Links: Sunday, June 9th, 2013

$
0
0

hackaday-links-chain

This week we saw an interesting animated motorcycle tail light over on Reddit. But there wasn’t really enough background to get its own feature.

The NeuroKnitting project captures brainwaves by weaving them into a scarf.

On Semiconductor is showing off an 8x8x8 LED cube which they claim as 12,000 LEDs. We can’t figure out where all those LEDs are used in the design, but maybe you can. Here’s one that we know has 4096 LEDs in its matrix.

[Jeff] used hard drive platters as the disc section of his original Enterprise desk model.

Play around with an SNES controller and Arduino by following [Damon's] guide.

Hackaday Alum [Jeremy Cook] posted an update of his laser graffiti project. His earlier effort used camera tricks to capture the image but this time around he’s exciting phosphorescent glow material to make a persistent display visible to the human eye.

This server hides in plain sight after being wrapped in a hard cover book binding. Hopefully this won’t cause heat dissipation problems.

[Trumpkin] built his own Nixie tube wristwatch which we think has the potential to be as neat as the one [Woz] wears.


Filed under: Hackaday links

Tiny 3x3x3 SMD LED Cube

$
0
0

led cube

LED cubes are cool, but they’re usually pretty big and clunky. [One49th] set out to make one of the smallest LED cubes we’ve seen yet, and he’s shared how he did it in his Instructable!

His first LED cube was the traditional kind, and it turned out pretty nice. But he wanted to go smaller — what about using SMD’s? What he did next was no simple feat — in fact, we’d be willing to call him an artist with a soldering iron. The array is just over one centimeter across.

Using a combination of vices and pliers he soldering each SMD onto his structure one by one. Each LED anode is tied together on each horizontal layer. Each cathode is tied together on each vertical column. This allows the TinyDuino to control any one LED by knowing which of the 9 columns and 3 layers the LED is on. Send a high signal to chosen layer, and a low signal to the column to light the LED. Doing this quickly allows you to create the illusion of different LEDs being on at the same time. Take a look through his image gallery to see just how tight the soldering quarters were, it’s definitely not something we’re planning on doing anytime soon!

Looking for a bigger cube? Check out this gorgeous 7x7x7 one that is capable of 142 frames per second!


Filed under: Android Hacks, led hacks

8X8X8 Cube Invaders

$
0
0

F98YM6YHQQLNHN7.LARGE

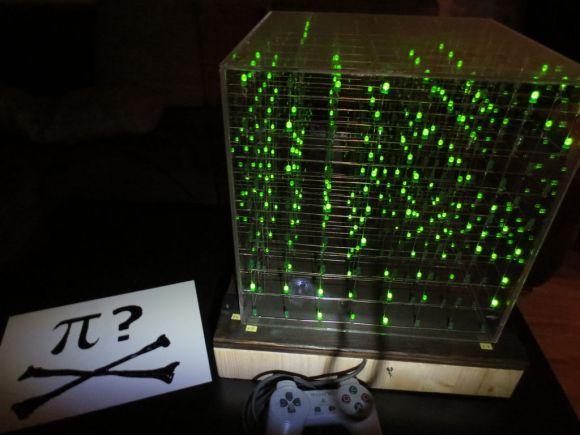
Believe it or not, [Anred Zynch] had no soldering skills before starting this project! What we’re looking at here is an 8x8x8 LED cube set up as a Space Invaders style game with a Playstation 1 controller.

He was inspired by several other cubes like [Chr's], and the Borg cube by [Das-Labour]. The project makes use of an Arduino Mega 2560 R3 to drive the 512-LED array, and an Arduino Uno to take care of the sound effects during game play. It’s kind of like Space Invaders — but in 3D!

Complexity of building and wiring it aside, [Anred] has provided great instructions and the code for the entire project, so if you’re looking to recreate it or something like it, you can! It’s also entered in an Instructable’s contest right now, so if you like it, we’re sure he’d appreciate the votes.

And showing off the cube’s effects:

Not enough LEDs for you? How about this massive 16x16x16 cube? Too many LEDs? Okay, how about this tiny 3x3x3 cube?


Filed under: Arduino Hacks

Gaming on an 8x8x8 LED Cube

$
0
0

LEDCube

Building an LED cube is a great way to learn how to solder, while building something that looks awesome. Without any previous experience with soldering or coding, [Anred] set out to create a simple 8x8x8 LED cube gaming platform.

Rather than reinventing the wheel, [Andred] based the LED cube off of three separate Instructables. The resulting cube came out great, and the acrylic casing around it adds a very nice touch. Using an Arduino Mega, the 74HC574, and a few MOSFET’s to drive his LEDs, the hardware is fairly standard. What sets this project apart from many other LED cube builds, is the fact that you can game on it using a PlayStation 1 controller. All the necessary code to get up and running is included in the Instructable (commented in German). Be sure to see the cube in action after the break!

It would be great to see a wireless version of this LED cube game. What kind of LED cube will gaming be brought to next? A tiny LED cube? The biggest LED cube ever? Only time will tell.


Filed under: led hacks

L3D Cube Takes the Work out of Building an LED Cube

$
0
0

Building an LED cube usually means a heck of a lot of delicate soldering work. Bending jigs, assembly jigs, and lots of patience are the name of the game. The problem multiplies if you want to build with RGB LEDs. [Shawn and Alex] are hoping to change all that with their L3D cube. Yes, L3D is a Kickstarter campaign, but it has enough good things about it that we’re comfortable featuring it here on Hackaday. What [Shawn and Alex] have done is substitute WS2812b surface mount LEDs for the 5mm  or 3mm through hole LEDs commonly used in cubes. The downside is that the cube is no longer visible on all sides. The upside is that it becomes a snap to assemble.

The L3D cube is open source hardware. The source files are available from separate software and hardware Github repositories. Not next week, not when they hit their funding goal, but now. We seriously like this, and hope all crowdfunding campaigns go this route.

The L3D cube uses an open source Spark Core as its processor and WiFi interface. Using WS2812b’s means less I/O pins, and no LED driver chips needed. This makes it perfect for a board like Spark or Arduino.  On the software side, the team has created a Processing Library which makes it easy to create animations with no coding necessary.

L3D has all the features one would expect from an LED cube – a microphone for ambient sound visualizations, and lots of built in animations. It seems [Shawn and Alex] have also created some sort of synchronization system while allows multiple cubes to work together when stacked. The team is hoping someone will come up with a 3D printed light diffuser to make these cubes truly a 360 degree experience.

The L3D cube campaign is doing well, [Shawn and Alex] are close to doubling their $38,000 goal. Click past the break to check out their Kickstarter video!


Filed under: led hacks

Hackaday Links: February 1, 2015

$
0
0

It’s Sunday evening, and that means Hackaday Links, and that means something crowdfunded. This week it’s UberBlox. It’s a modular construction system based on Al extrusion – basically a modern version of an Erector set. Random musings on the perceived value UberBlox offers in the comments, I’m sure.

[Trevor] sent in something from his Etsy shop. Normally we’d shy away from blatant self-promotion, but this is pretty cool. It’s reproductions of 1960s Lockheed flying saucer plans. We’re not sure if this is nazi moon base/lizard people from the inner earth flying saucer plans or something a little more realistic, but there you go.

3D computer mice exist, as do quadcopters. Here’s the combination. It looks like there’s a good amount of control, and could be used for some aerobatics if you’re cool enough.

Who doesn’t love LED cubes? They’re awesome, but usually limited to one color. Here’s an RGB LED cube. It’s only 4x4x4, but there’s a few animations and a microphone with a beat detection circuit all powered by an ATMega32u4.

A while ago we had a post about a solar powered time lapse rig. Time lapse movies take a while, and the results are finally in.


Filed under: Hackaday Columns, Hackaday links

Glowing LED Cubes From The Future

$
0
0

Sometimes people don’t believe you when you tell them something. You may have to go out of your way to convince those skeptics. Well, [AlexTheGreat] was having a hard time convincing people that he was from the future. He thought building some cool looking glowing LED cubes would help his story.

Underneath the fancy exterior covering is a cube made from pieces of clear acrylic sheet that are hot-glued together. There isn’t much inside the cube, just an LED, resistor, button cell battery and an on/off switch. A hole in one of the cube sides allows access to the on/off switch. Once all the components are verified to work, the interior of the cube is filled with hot glue to diffuse the light.

LED Cube from the futureThe exterior is thin sheet metal cut into cool shapes and bent around the plastic cube. Like the rest of the components, these metal covers are held on with hot glue. They do a great job of blocking the LED light ensuring it shines out of the creatively arranged gaps. We’re not sure if these will convince anyone that [AlexTheGreat] is from the future but they are certainly darn cool looking!


Filed under: led hacks

Building The World’s Smallest RGB LED Cube

$
0
0

What’s the smallest RGB LED cube? A 1x1x1 cube is easy, but it’s a stupid joke and we’ve heard it before. No, to build the smallest LED cube, you’ll have to stuff 64 RGB LEDs into a cubic inch, like [Hari] did with his miniscule LED cube.

A single column of Charlieplexed LEDs. Note the resistor for scale.

One might think that individually addressable RGB LEDs are the way to go with an LED cube this small. Anything else would hide the LEDs behind a mess of wires. This isn’t the case with [Hari]’s LED cube – he’s using standard surface mount RGB LEDs for this build. But how is he connecting the things?

The entire build was inspired by the a much earlier project, the Charliecube. This LED cube, like [Hari]’s uses Charlieplexing to condense all the connections for a column of LEDs to only four wires. Repeat that sixteen times, and [Hari] built himself a tiny, one-inch cube of glowey goodness.

The cube itself was built with a PCB backplane designed in Eagle and fabbed at OSHPark. The LEDs are driven by an Arduino Nano. If you’d like to build your own, or you’re a masochist for dead bug soldering, you can grab all the design files over on [Hari]’s hackaday.io project page.


Filed under: led hacks

World’s Smallest LED Cube – Again

$
0
0

There’s a new challenger on the block for the title of the “Worlds Smallest 4x4x4 RGB LED Cube“. At 13x13x36 mm, [nqtronix]’s Cube Pendant is significantly smaller than [HariFun’s] version, which measures in at about 17x17x17 mm just for the cube, plus the external electronics. It took about a year for [nqtronix] to claim this spot, and from reading the comments section, it seems [HariFun] isn’t complaining. The Cube Pendant is small enough to be used as a key fob, and [nqtronix] has managed to really cram a lot of electronics in it.

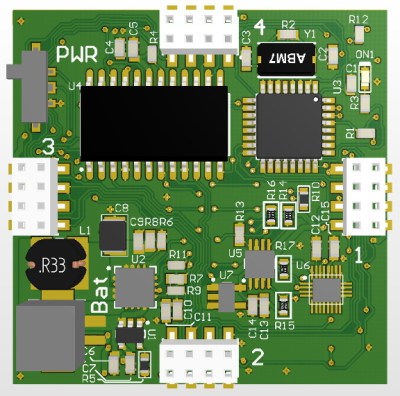
The LED’s used are 0606 RGB’s which are 1.6mm square, although he did consider using 0404’s before scrubbing the idea. There’s many ways of driving 192 IO’s, but in this case, Charlieplexing seemed like the best solution, requiring 16 IO’s. Unlike [HariFun]’s build, this one is fully integrated, with micro-controller, battery and everything else wrapped up in a case made entirely from PCB — inspired by [Voja Antonic]’s FR4 enclosure technique, and the LED array is embedded in clear resin.

led_cube_02Along the way, he’s had to resort to several hacks to bring it to fruition. For starters, he’s used the ATmega328BP [pdf], instead of the more usual ATmega328P, giving him extra IO’s to play with. And since Charlieplexing works better at higher voltages, he’s using a boost converter to provide +5.5V — the max. limit for the ATmega — to drive the cube. The LiPo charger has a slightly unusual P-MOSFET switching section to switch between USB input and LiPo without causing too much of a voltage drop. There’s a few parts to help detect low voltage, but his code doesn’t yet use this feature.  He’s also thrown in an accelerometer in to the mix to respond to taps, double taps and shakes, but this too is not yet implemented in code. Since he ran out of board space, the EEPROM is dead-bug soldered. And the push button is built from, well, pulling apart a regular push button and using its innards. He’s posted the DIPtrace board design files as well as the code on the Instructable, in case some one else wants to take a stab at replicating the cube. Although we must say that apart from being a soldering Ninja, you also need pretty good mechanical chops to build this tiny cube.

Filed under: led hacks, slider

540 PCBs Make a Giant LED Cube

$
0
0

Just about anyone can make a simple LED cube. But what if you want to make a 1-meter cube using 512 LEDs? [Hari] wanted to do it, so he created two different kinds of LED boards using EasyEDA. There are 270  of each type of board, for a total of 540 (there are only 512 LEDs, so we guess he got some spares due to how the small boards panelized). The goal is to combine these boards to form a cube measuring over three feet on each side.

To simplify wiring, the boards are made to daisy chain like a cordwood module. However, to get things to line up, each column of LED boards have to rotate 90 degrees. You can see several videos about the project below.

We’ve covered EasyEDA before. It is a browser-based tool for defining PCBs and includes many other features like simulation and autorouting. You can download the CAM files from the tool or you can order the boards directly from the site very easily.

[Hari] apparently likes LED cubes large or small. EasyEDA, by the way, isn’t the only browser-based solution out there.


Filed under: led hacks

Resistance is Futile, You Want this LED Cube

$
0
0

We’re suckers for a good desk toy here at Hackaday, so this 2019 Hackaday Prize entry from [Jack Flynn] certainly caught our eye. The idea is that by using professionally manufactured dual layer PCBs and only surface mount components, you can create a cube that has an LED matrix on each face and all of the electronics hidden within. We’re not entirely sure if there’s any practical application for such a device, but we know we’d certainly like to have one blinking madly away on our shelf regardless.

Before having any of the PCBs manufactured, [Jack] is putting a considerable amount of thought into the design so he doesn’t end up painting himself info a corner (which is of course eight times as bad when you’re building a cube). By importing the PCB files into OnShape, he’s able to “assemble” a virtual representation of the final product to better understand how everything will fit together. He wants to limit the amount of times the cube will need to be pulled apart, so everything from how it will sit in its 3D printed cradle to the placement of breakaway tabs that ensure the internal power switch is accessible are being carefully planned out.

The current design puts the “brains” on the bottom board, with every other panel holding a daisy-chained MAX7219 to drive its own individual 64 LED matrix. Initially the dimensions of the ATmega328p powered cube will be 42 x 42 x 42 mm, with a total of 384 LEDs. Ultimately, [Jack] hopes the modular nature of the design could allow the size of the cube to be increased, or perhaps even take on a different shape entirely.

Generally the LED cubes we see are of the more wiry variety, so it’s particularly interesting when they take on solid forms like this one. Given the nearly universal popularity of blinking LED gadgets, we think this particular project is well positioned to make the leap from one-off hack to a commercial product.

OpenGL Shaders And An LED Cube

$
0
0

Back in February at the Hacker Hotel camp in the Netherlands, among the many pieces of work around the venue was a rather attractive LED cube. Very pretty, but LED cubes have been done many times before.

If a casual attendee had taken the time to ask though, they might have found something a little more interesting, for while the cube in question might have had the same hardware as the others it certainy didn’t have the same software. [Polyfloyd] had equipped his LED cube with OpenGL shaders to map arbitrary images to the cube’s pixels in 3D space.

Hardware-wise it’s the same collection of AliExpress LED panels and Raspberry Pi driver board that the other cubes use, in this case mounted on a custom laser-cut frame. Driver software comes from an open-source library round which he’s put a wrapper allowing input through a UNIX pipe. This can take the RGB output of an OpenGL shader, of which he has created both 2D to 3D and spherical projection versions. The must-see demo is a global map of light pollution, and the result is a rather impressive piece of work.

If LED cubes are your thing, don’t forget this recent Hackaday Prize entry.

Epoxy LED Cube Looks Sleek, And Flashes To The Beat

$
0
0

If there’s one thing that’s universally popular in these polarizing times, it’s colorful glowing objects. LEDs reign supreme in this area, and we’re accustomed to seeing all manner of fun flashy devices hit the tips line. Today is no different, and we’ve been looking at [Modustrial Maker]’s stylish epoxy LED cube.

The build starts with the casting of a black epoxy cube, with a cutout near the top in which the LEDs will be installed. A melamine form is used, with aluminium foil tape, caulk and paste wax to help seal it up. After releasing the cast from the form, there were some unsightly voids which were swiftly dispatched, by trimming the block down with a table saw. With the block cut to size, LED strips were installed, and the light cavity sealed with hot glue before white epoxy was poured in as a diffuser. All that’s left was a simple matter of polishing the cube and installing electronics.

The cube runs from a single-cell LiPo battery, and there’s a wireless power receiver and charging module to keep the power flowing. The cube can be used on most wireless phone chargers, as well as its own dedicated charging base. The LEDs are controlled by an off-the-shelf module, which offers a variety of flashing displays as well as a music-reactive mode.

While the electronics side is done with off-the-shelf parts, the real art in this piece is in the build of the cube. Its glossy, attractive form would look stunning on any coffee table or bedside shelf.

LED cubes are a great rabbit hole to go down on your lunch break. This OpenGL-enabled build is particularly impressive. Video after the break.

This Rubik’s Cube Lamp Has Some Serious Retro Style

$
0
0
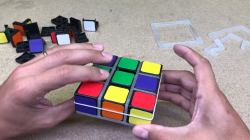
The reassembly is handled with super glue and acrylic to diffuse the light.

There’s an easy way to signal to your friends and family that you’re a successful, urbane member of society – by decorating your home with tasteful references to popular culture. A classy oil painting of Yoda or a framed Tarantino movie poster is a great way to go. Alternatively, consider building yourself a swanky Rubik’s Cube lamp.

The build starts by disassembling the cube, as if you were going to cheat and reassemble it in the correct order. Instead, the cube is then gutted to make room for electronics. Inside, a ping pong ball covered in LEDs is installed, along with lithium batteries and a power board cribbed from a USB power bank. The whole assembly is laced back together with glue and frosted acrylic which acts as an retro-styled grid-like diffuser. The power button is even sneakily hidden in one of the squares!

It’s a sweet retro build that would make an excellent addition to any hip lounge room. We’re a big fan of self-contained glowing cubes here at Hackaday – we’ve covered nuclear powered and infinity designs before. Video after the break.

Viewing all 37 articles
Browse latest View live